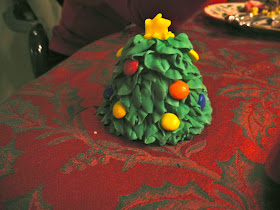
I started with a stack of circle nesting cookie cutters and my roll out cookie recipe. I used the smallest and the next 6 largest cookie cutters.
For each cookie tree I made 1 cookie using the largest circle cutter and one cookie using the smallest circle cutter.
 Then to make the hollow middle I made cookie rings out of the other circles. So for each layer I used the next largest circle cookie cutter for the outside of the ring, then cut a hole in the center of it with the circle cutter one or two sizes down in size. For every other layer I made two cookie rings of the same size, to give the tree some height. When creating cookie rings, the actual cookies are small and you don't want them to burn and then break, so subtract about a 30 seconds to a minute from the bake time each time you make a smaller layer.
HINT: Make a few extra cookies for each layer to allow for breaking. Since I was making it for a table set for 13, I made 15 of each layer and 17 of the smallest layers, just in case.
To Assemble:
You will need a large batch of green royal icing (at least 1 full batch, probably 1 1/2 batches) and a small batch of yellow royal icing, you will also need decorations (I used M&Ms) and yellow fondant for stars.
- Start with the largest cookie, then using green royal icing attach all the layers from largest to smallest. Before adding the solid top layer stuff the inside with M&Ms or whatever you want to fill them with. Someone suggested that next time I fill them with fortunes or a toy. Then add the top layer on and let them harden.
- Taking a spatula spread the green royal icing around the entire tree. This closes any cracks and gives you a solid green color underneath the leaves, allowing room for gaps. Allow to dry completely.
- While they are drying create the stars out of yellow fondant.
- Once the tree bases are dry using a piping bag adorned with the leaf tip, pipe leaves on the cookie tree, starting at the bottom and working up. If you don't have a leaf tip you can also use a star tip (see the Wilton Cookie Tree above.) Before the tree is dry add the ornaments (M&Ms).
- Using the yellow icing and a star tip add a little icing to the top of the tree and attach the star.
Let stand to dry. Once they are dry carefully peel off wax paper.
Note: Do this early. You want the icing to harden almost 24 hours before putting them on the place settings.


No comments:
Post a Comment